copy from Chezpim
Pad Thai is one of the most popular Thai dishes, perhaps second only to Tom Yum Goong. It's also one of the most requested recipes here on Chez Pim. Why, then, has it taken me this long to post this recipe, you asked? I don't know...perhaps it's because I don't actually have a recipe! Is that a good enough reason?
Then what am wasting your time for, you are wondering, yes? Well, it's true that I don't have a recipe, but what I have, and will share with you here, is way better than a recipe. It's in fact a fool-proof way to make Pad Thai -Pad Thai for just about anyone from beginners to experts. I must warn you that I will a bit wordy. I could easily write a very short description and make everything look and sound easy -but that means I'd be leaving you to figure out the details on your own. Or I could explain every step of the way so that you understand what goes into a Pad Thai and what distinguishes a great one from the usual blah. The piece might look a little intimidating, but I think it will in fact be easier than any easy-looking recipe. And, I promise you, if you read through the entire thing, you'll never have to look at another Pad Thai recipe. You'll be set. Really you will.
There are so many silly Pad Thai recipes around, a quick google reveals one with ketchup as an ingredient. What an abomination! Not even the fabulous June Taylor's artisanal ketchup can rescue that one! A few other recipes I came across would have us make four or more portions of Pad Thai at once –which, I can guarantee you will result in clumps of oily, sticky noodle unfit for human consumption.
The textures and flavors of a proper Pad Thai derive largely from the way the dish is cooked, that is to say its quick footloose dance in an ultra hot wok. That simply means you can't do many servings at once.
No, no, I'm not going to make you drive around town procuring all the exoticities required to make a proper Pad Thai only to feed just you and your sweetheart. It is entirely possible to feed a whole crowd. You just have to do it like they do on the streets of Bangkok -cook one or two portions at a time. Your friends and dinner guests must be a bit patient, but they will kiss you in the end –no, not the rear end, just the end of your party, get your mind off the gutter you!
Another common mistake in a Pad Thai recipe is to season while cooking in the wok, which once again get in the way of that super-heated wok-quickstep I mentioned before. If you follow those recipes that have you measure a tablespoon of fish sauce and one of tamarind and yet another of palm sugar into the hot wok during the cooking, you are –it pains me to say- doomed to failure. By the time you're done adding all the whatnots, your noodle turns gooey, your protein done to the texture of a rubber eraser, and your perfectly innocent Pad Thai becomes what I call a sorry excuse of the dish. Bad all around.
Once again a little street sense can help a whole lot. Pad Thai vendors in Thailand don't season their Pad Thai one portion at a time. They usually have a giant vat of sauce pre-made waiting patiently by the wok station. As they cook a portion they add the sauce -no guess work, no fumbling with this bottle and that, a ladle full of the pre-seasoned sauce and that's it. Easy enough, yes?
That's how I do it. I make my sauce beforehand. I don't even care if I make too much sauce, since it keeps quite well in the fridge for a long time –comes very handy for a quickie Pad Thai fix later. I also prepare all the other ingredients and have them ready. (You can be fancy and call it mise en place like the French do, or just a simple meez like all the American cooks I know.) When my guests arrive I get the wok smoking hot and make one or two portions at a time until everyone has their fill of the noodle-y goodness. They can even take the wok on a spin and make one on their own. My friends get a kick out of that, yours might too.
So you begin by preparing the sauce.
There are four ingredients in the Pad Thai sauce, Tamarind pulp (for the sour flavor), Fish Sauce (for the salty part), Palm Sugar (for a slight sweetness), and Paprika or Thai chilli powder (for the spice). Two cups of sauce will make about 6-8 portions of Pad Thai. You can make your Pad Thai sauce vegetarian by using this sauce instead of fish sauce.
To make about two cups of sauce, you should begin with about ½ cup each of Tamarind (*see the note below for how to prepare tamarind pulp - I mix about 60gr tamarind pulp with about 1.5 -2 cups of water but then I need to use about 1 -1.5 cups of tamarind), Fish Sauce (I used 1/4 cup Fish sauce), and Palm Sugar. If you substitute white and/or brown sugar for the Palm Sugar, you should use only about 1/3 cup. Melt all these together in a small pot over a low flame. Taste and adjust the flavor balance until it suits you. Then add the chilli powder, begin with a teaspoon or two, depending on your taste, and keep adding until it tastes the way you like it. By the time you're done flavoring the pot should be simmering happily. Turn off the heat and let the sauce rest while you get to the other ingredients.
At this point in the game I like my sauce to lead with a salty flavor, follow by a mild sourness, then just a gentle sweetness and a soft caress from the chilli at the back of my throat at the very end. A finished plate of Pad Thai will be served with a sliver of lime and extra chilli powder to be mixed in at the table, so you could keep these two flavors in the sauce mild for now. I don't know about you but there is nothing I hate more than a cloying sweet Pad Thai. If your sauce starts out super sweet now it will be very tough to correct later.
Those of you with a scientific mind might want more precise measurements or proportion or whatnot. I'd do it if I could, but the problem is most Thai ingredients are not standardized in the way that a Western ingredient, say, white granulated sugar, is. A cup of granulated sugar is always the same, but a cup of your Palm Sugar or Fish Sauce might not have the same intensity as mine. So the easiest thing to do is just to taste. And herein lies another beauty of preparing the sauce ahead of time. You can take your time to taste and adjust the sauce precisely to your liking, which would be hard to do à la minute in the wok.
Now that you have your sauce ready and waiting, you can prep the other ingredients.
Here's a list of what you need, and the quantity to use per portion.
Thin rice noodle, also called Rice Sticks.
Get them fresh if you can find them at your nearby Asian markets. If not, buy dried noodle and soak in warm water until soften. Don't soak until the noodle is soft enough to eat, or it will turn into mush in the wok. Just do it until it's pliable, then drain well. You will need about 1-2 loosely packed cups per portion, depending on how carb-happy you are. You can use more or less, entirely up to you and your friends. A 500g (or about 16oz) bag of dried noodles should be enough for 6-8 portions. Buy a little extra just to be sure. It's cheap and, if left unsoaked, will last just about forever.
Depending on the freshness of your 'fresh' rice noodle, you might want to soak it anyway just to soften it a bit more. Follow the same step as the dried noodle but do not soak for as long. One normal bag of fresh noodle, usually around 500g, will be enough for 3-4 portions.
Shrimps, or chicken, or for vegetarians see under 'Tofu' below
The more traditional version of Pad Thai uses shrimps. I use about 7 pieces of medium size shrimps per portion, peeled of course. You can be as generous as you want.
You can also easily substitute chicken, about 2oz of chicken meat (cut into bite-size pieces) per portion will be plenty.
Tofu
(For 2 portions, I used 2 carrots. It adds some crunchy texture) I like to use the pressed tofu that comes in square blocks. You can use just about any firm-textured tofu you can find, even the pre-fried varieties from Chinese markets. As long as it doesn't disintegrate when fried in the wok, you will be fine. I cut the tofu into thin, bite-size pieces, and use about a small handful in each carnivorous portion. For a vegetarian portion, with only tofu and no other meat, you will have to use more. A little guess work is involved here but it's easy enough, yes? (To make it completely vegetarian, you can use this sauce in place of fish sauce.)
Eggs
I usually crack one small egg into the wok while cooking each serving. If you dinner guests like less egg you can make two servings at a time and only crack one egg into the wok while cooking, essentially cutting the egg quantity in half in each portion.
Ground Peanuts
(I used roasted almonds - put almonds in the 150C oven, stirred once or twice, until it has nice smell and browner color) instead of peanuts because my boyfriend can't eat peanuts) I use roasted and unsalted peanuts (sometimes I roast my own) for this. Ground the peanuts roughly, beware not to overdo it as you will end up with peanut butter and not ground peanuts. You will need 1-2 tablespoons per portion, depending on how much your friends like peanuts.
Flat-leaf Garlic Chives, also called Chinese Chives
Bai Gui-chai as they are called in Thai. Although most restaurants use the green part of green onions or spring onions, Garlic Chive is the more traditional herb for Pad Thai. Wash and dry the chives carefully, then cut into 2 inches pieces. I use a handful of them per portion.
Beansprouts
I love a lot of beansprouts in my Pad Thai, so I use almost a full cup per portion. You can use as much or little as you like. You can even skip them entirely.
Pickled Turnips (optional)
You can buy pickled turnips pre-chopped in a plastic bag, but I think the whole ones are fresher. I chopped whole turnips into small bits, and use about 1 tablespoon per portion.
Dried shrimps (optional)
The cheaper versions of Pad Thai on the streets of Bangkok are made with only tiny dried shrimps and no fresh ones at all. I don't want to go that far, but I still like to add a bit of these salty dried shrimps for extra flavor -you can easily skip it altogether. I take a bit of dried shrimp and pound in a stone mortar and pestle until fluffy. It's important to use the mortar here and not your cuisinart, which will turn to dried shrimp into hard, dried chunks (entirely capable of cracking a tooth) instead of fluffy bits of salty shrimp. I use about 1-2 tablespoon per portion.
Chopped garlic (optional)
I like to use a little bit of garlic in each portion, give it an extra kick. You don't have to.
To serve as condiments at the table you will need:
Slivers of lime, extra ground peanuts, extra chilli powder, fish sauce, and even a bit of white sugar. Just like other street food in Thailand, everyone can tailor the final dish to their own taste. I suggest a squeeze of lime for sure, and anything else that pleases you.
Toast yourself with a glass of champagne now that the prep is done before your dinner guests arrive. A nice off-dry and not oaky champagne will go well with the Pad Thai later too. Lovely Rieslings will do fine as well.
While you're savoring your champagne, let me tell you a bit about that temperamental beast that's your well-seasoned wok (**see note below). The success of your Pad Thai depends on it. A wok is not built for heat retention or long and even cooking, unlike Western style pots and pans. A Le Creuset pot, for example, is built like a marathon runner, slow to warm up but has a long staying power. A wok, on the other hand, is more like a sprinter. It heats up really fast, and loses it just as quickly. The thin iron steel material in a good wok transfers more or less all the heat from the flame directly to the content inside. This is great for the ability to control heat, you can turn the fire up and down and the heat in the pan will rise and fall just as quickly. This also means that a wok can sear and cook a small amount of food lightening fast. Adding too much all at once and letting the heat escape would turn a wok into a useless piece of tin in a blink of an eye. And since the caramelization and charring from a hot wok is where the wok-flavor, or wok-breath as some call it, comes from, your utmost goal in wok-cooking is to start out hot and keep it hot! Make sure that all your ingredients are at room temperature, and that you add them in sequence and let the wok reheat back up before each addition. At no time should you add a huge amount of ingredients all at once, unless you want a Pad Thai stew.
Now you are ready to make a Pad Thai.
Follow these steps carefully and the best Pad Thai you've ever had will be the one you've just made! Keep the sauce pot warm on another burner next to your wok. Keep a bowl of water handy too, if things get to hot in the wok you can sprinkle the water on it to slow it down.
- Heat a large wok over high heat until very hot, to the point of smoky.
- Add a splash of oil, about 3-4 tablespoons. Don't be shy, this ain't no diet food.
- (I cook carrots or about 30 seconds in this step) If you are making chicken Pad Thai, add the chicken first, cook, stirring vigorously, until it's half way done, about 1-2 minutes, then add the tofu, a tablespoon or two of the sauce to flavor the chicken, and a pinch of garlic if you're using it. If you are making tofu or shrimp and tofu Pad Thai, then only add the tofu (and garlic) for now. Cook for another minute until the tofu is crisp and slightly brown at the edges.
- Add the noodle, about 2 loosely packed cups for one portion is my standard, and then a ladle (about ¼ cup) of warm sauce. Stir rigorously, keep everything moving in the wok, and cook the noodle until soft. Remember to break up the noodle and don't let it lump together. If the sauce evaporates too quickly and your noodle isn't quite ready, sprinkle a bit of water and keep stirring. Add a bit of oil if the noodle still stubbornly sticks together. As I said, this ain't no diet food.
- When the noodle is ready (taste it to be sure), push it up to one side of the wok and crack an egg into the middle. Let it set for 10-15 seconds and toss everything all together.
- Add the shrimp meat, pickled turnips, ground peanuts, ground dried shrimp, beansprouts. Keep things moving. Add more sauce if it looks a little pale.
- When the shrimps are done, shouldn't take more than a minute, add a handful of Garlic Chives. Turn the heat off, and quickly give the wok a good stirring to mix everything together.
- Add the finished Pad Thai to a plate and serve to your first lucky dinner guest. Give the used wok a quick rinse with warm water, wipe off any excess bits of food with a warm towel, then put the wok back on to the fire.
- As soon as it heats back up to a smoking point, you're ready to do another portion. Repeat this process until all your dinner guests are fed. Keep them lubricated and happy with ample supply of Riesling, Champagne, and/or beer while they wait. That's how I do it!
That's it friends, your lesson in Pad Thai. It's a bit long, like I said, but this will be the last thing you'll ever need to read about Pad Thai. You might never go out for Pad Thai again, even!
So, go on, throw your own Pad Thai party. Your friends will love you (even more.)
-----------------------
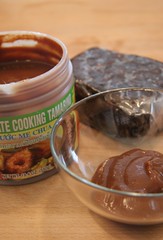
*A note on tamarind:
You can buy tamarind in blocks or readymade pulp that comes in plastic or glass containers (see the photo above). If you can't find a local market that carries tamarind you can order it online. If you buy readymade pulp, check to make sure that the ingredients only contain tamarind and water, no sugar or anything else. If you buy block tamarind, soak the block in 4 cups of hot water in a large bowl. Mesh the tamarind and water together and let sit until the water cool down enough not to burn your hands. Stick your hands -your impeccably clean hands as Julia Child would say- into the bowl and work the tamarind and water together until the consistency is a bit looser than room-temperature ketchup. Add more warm water if needed. Then, strain the mixture to remove the pits and tough membranes from the tamarind pulp. The consistency will be thick enough that you'd need to press it through the strainer. Use as much as you need for the Pad Thai sauce and keep the rest in a glass jar in your fridge. You'll have tamarind pulp handy for a long time.
This recipe is highly adaptable. Some people don't like the intensity of tamarind. Fine, just use less tamarind and add simple white vinegar til your desired sourness (pun intended). You won't be able to get rid of tamarind all together. Without it your Pad Thai won't be much of a dish, but you can use about half the tamarind I use and supplement the rest with vinegar.
**A well-seasoned wok
First of all, you'll need an iron steel wok -the cheapest kind made of a thin layer of iron steel that's sold in practically any Chinese market. There's no need to buy anything fancy, mine was less than $15 and it's working out great. You just have to keep it well-seasoned and it will last practically forever.
At any point in the making of this superb Pad Thai, if anything sticks to the pan and won't come out easily with a gentle push of a metal spatula, your wok isn't well-seasoned. No, no, you don't have to rush out to buy a replacement. You just have to season it again.
There are plenty of ways to season a pan, here's how I do it. First, add to your wok one cup of oil –make sure you brush the oil over all the inside surface of the wok- and heat the wok until it is smoking. Tilt the pan around to keep lubricating the surface with oil and let it continues to smoke for a few minutes –make sure your smoke vent is running and all the windows are open, by the way. Then, take the pan off the heat and dispose of the oil. Pour half a cup of kosher salt into the wok and, with a kitchen rag, rub the salt all over the inside surface of the wok. Throw out the salt, wipe the wok clean with a damp towel. Pour a small amount of oil into a paper towel and wipe the oil all over the inside surface again. Your wok is now seasoned and ready.
No comments:
Post a Comment