Thursday, January 15, 2009

Crunchy Baked Pork Chops

Serves 4. Published January 1, 2008. From Cook's Illustrated.

This recipe was developed using natural pork, but enhanced pork (injected with a salt solution) will work as well. If using enhanced pork, eliminate the brining in step 1. The bread crumb mixture can be prepared through step 2 up to 3 days in advance. The breaded chops can be frozen for up to 1 week. They don't need to be thawed before baking; simply increase the cooking time in step 5 to 35 to 40 minutes.

Ingredients


Table salt
4 center-cut boneless pork chops , 6 to 8 ounces each, 3/4 to 1 inch thick, trimmed of excess fat
4 slices hearty white sandwich bread , torn into 1-inch pieces
1 small minced shallot (about 2 tablespoons)
3 medium garlic cloves , minced or pressed through garlic press (about 1 tablespoon)
2 tablespoons vegetable oil

Ground black pepper
2 tablespoons grated Parmesan cheese
1/2 teaspoon minced fresh thyme leaves
2 tablespoons minced fresh parsley leaves
1/4 cup unbleached all-purpose flour plus 6 tablespoons
3 large egg whites
3 tablespoons Dijon mustard

Lemon wedges

Instructions

  1. 1. Adjust oven rack to middle position and heat oven to 350 degrees. Dissolve 1/4 cup salt in 1 quart water in medium container or gallon-sized zipper-lock bag. Submerge chops, cover with plastic wrap, and refrigerate 30 minutes. Rinse chops under cold water and dry thoroughly with paper towels.

  2. 2. Meanwhile, pulse bread in food processor until coarsely ground, about eight 1-second pulses (you should have about 3 1/2 cups crumbs). Transfer crumbs to rimmed baking sheet and add shallot, garlic, oil, 1/4 teaspoon salt, and 1/4 teaspoon pepper. Toss until crumbs are evenly coated with oil. Bake until deep golden brown and dry, about 15 minutes, stirring twice during baking time. (Do not turn off oven.) Cool to room temperature. Toss crumbs with Parmesan, thyme, and parsley.

  3. 3. Place 1/4 cup flour in pie plate. In second pie plate, whisk egg whites and mustard until combined; add remaining 6 tablespoons flour and whisk until almost smooth, with pea-sized lumps remaining.

  4. 4. Increase oven temperature to 425 degrees. Spray wire rack with nonstick cooking spray and place in rimmed baking sheet. Season chops with pepper. Dredge 1 pork chop in flour; shake off excess. Using tongs, coat with egg mixture; let excess drip off. Coat all sides of chop with bread crumb mixture, pressing gently so that thick layer of crumbs adheres to chop. Transfer breaded chop to wire rack. Repeat with remaining 3 chops.

  5. 5. Bake until instant-read thermometer inserted into center of chops registers 150 degrees, 17 to 25 minutes. Let rest on rack 5 minutes before serving with lemon wedges.

  6. The 30-Minute Brine

  7. You might be tempted to skip the brining step when preparing Crunchy Baked Pork Chops. Don't. Center-cut chops are quite lean, and left untreated they will be very dry and chewy, even when cooked to medium (an internal temperature of 150 degrees). The salt in the brine changes the structure of the muscle proteins and allows them to hold on to more moisture when exposed to heat. My tasters had no trouble picking out the chops that I had brined versus chops that I had left untreated.

  8. If you're accustomed to brining a turkey for the holidays, you might think you don't have time to brine pork chops for a weeknight recipe like this. But I found that making the brine super-concentrated (with 1/4 cup of table salt dissolved in 1 quart of water) gets the job done in just 30 minutes-the time it will take you to prepare the fresh bread crumb coating. And my potent brine fits, along with four chops, in a medium container or gallon-sized zipper-lock bag. No brining bucket needed.

  9. One exception: If you've purchased enhanced chops injected with a salt solution, don't brine them. The injected solution will make the chops moist, even spongy, and brining will make the meat way too salty. We prefer the flavor of natural chops and find that 30 minutes in a strong brine makes them plenty juicy.

Friday, January 9, 2009

Salad khoai tây tôm

copy tu chi Trang


Món ăn này thoạt nhìn giống salad Nga nhưng hương vị thì vô cùng đặc trưng với đầy đủ gia vị chua, cay, mặn, ngọt, thật thích hợp với những bữa tiệc đãi khách.
Thành phần (dành cho 4 người)
1. Phần Salad
- Tôm...10 con
- Khoai tây...2 củ
- Carot...1/2 củ
- Hành tây...1/4 củ
- Muối, tiêu...1 chút
- Mayonnaise...2 thìa canh
- Mù tạt vàng...1 thìa cafe
- Rượu brandy...1 thìa cafe
2. Phần nước sốt
- Mayonnaise...1 thìa canh
- Ketchup...1/2 thìa canh
- Kem tươi...1/2 thìa cafe
- Rượu brandy...1/2 thìa cafe
- Nước chanh...1/2 thìa cafe
- Tabasco...1/3 thìa cafe
3. Phần trình bày
- Hành hoa... 1 chút
- Cà chua...1 miếng
Cách làm :
1. Khoai tây, carot luộc chín, xắt hạt lựu. Hành tây xắt nhỏ. Tôm luộc chín bóc vỏ, xắt nhỏ 5 con.
2. Trộn chung khoai tây, carot, hành tây, tôm xắt nhỏ cùng muối tiêu, mayonnaise, mù tạt, rượu.
3. Chế biến nước sốt bằng cách trộn các nguyên liệu đều nhau.
4. Bày salad ra đĩa, xếp tôm nguyên con lên trên, rưới nước sốt đều lên bề mặt, rắc hành hoa và cà chua trang trí.

Bạn cũng có thể thay tôm bằng cua và cho thêm dưa chuột muối cũng rất ngon.

Cơm cá - さんまのかば焼き丼

Copy tu chi Trang


Hương vị rất gần gũi với món cá kho Việt Nam mà cách chế biến lại gọn gàng, phù hợp lắm cho 1 bữa cơm thiếu thốn thời gian. Vài miếng cá đậm đà đặt lên bát cơm nóng hổi, ăn kèm chút dưa muối chua cùng bát canh miso, đó là 1 trong những thực đơn ăn trưa đơn giản kiểu Nhật...
Nguyên liệu (dành cho 2 người):
- Cá Sanma.....3 con - khoảng 500g (có thể thay thế bằng lươn bien hoặc các loại cá thân dài khác)
- Bột mỳ.....2 thìa canh
- Hành hoa.....5 nhánh
- Gừng.....1 củ nhỏ
- Lá tía tô xanh.....10 lá (ở đây nàng không dùng)
- Vừng.....1 thìa cafe
- Nước tương.....3 thìa canh
- Mirin.....3 thìa canh (hoac 1/2 thia ca fe duong)
- Rượu nấu.....3 thìa canh
- Đường.....1 thìa canh
- Dầu rán.....2 thìa canh
- Cơm.....phần 2 người
- Hạt tiêu.....1/2 thìa cafe
Cách làm:
1. Pha chế nước sốt
Gừng gọt vỏ ngoài, đập dập thái nhỏ.
Hòa nước tương, mirin, rượu nấu, đường đều nhau.

2. Chuẩn bị rau, hành
Hành hoa cắt từng cọng, tước nhỏ, ngâm vào nước khoảng 5 phút cho hành có độ cong tự nhiên.
Sau thời gian ngâm hành nói trên, vớt hành để ráo nước.
  • Có thể thay hành hoa bằng hành bora. Khi đó thái hành thành các chỉ dài, cho hành vào đảo đều trong dầu rán trước khi rán cá.
Lá tía tô rửa sạch, thái chỉ.

3. Sơ chế và rán cá
Cá rửa sạch lọc bỏ xương ở phần thân, cắt mỗi miếng dài khoảng 15cm.
Lau khô cá, rắc bột mỳ đều 2 mặt.
Cho dầu rán vào chảo, dầu nóng, cho cá vào rán vàng 2 mặt.
Sau khi cá đã rán vàng, đổ hỗn hợp nước sốt đã chuẩn bị ở phần (1) vào đun nhỏ lửa cho tới khi nước sốt sánh lại còn 1/2 lượng nước ban đầu, 2 bên mặt cá thấm đều nước sốt.

4. Hoàn thành
Lấy cơm ra 2 bát ô tô (bát tô lô), bày hành xung quanh, xếp cá lên trên, rắc vừng xung quanh cá.
Cho lá tía tô lên trên, ăn nóng cùng chút hạt tiêu.

Ca' kho to

copy tu chi Trang

Nguyên liệu(dành cho 2 người):
- Cá bơn...2 miếng (khoảng 500g)
- Hành khô...3 củ
- Ớt tươi...2 quả
- Nước mắm...1 1/2 thìa canh
- Bột Knorr...1 thìa canh
- Đường...2 thìa canh
- Hạt tiêu...1 thìa cafe
- Dầu ăn...2 thìa canh
Cách làm :
1. Cá rửa sạch thấm khô nước. Ướp cá với nước mắm và bột Knorr
2. Hành khô bóc vỏ, thái mỏng, phi vàng với dầu ăn.
3. Đường cho vào nồi trưng nước hàng, khi nước đường có màu vàng caramel tắt ngay bếp, cho vào nồi 100ml nước.
4. Xếp cá vào nồi nước hàng, cho ớt, hành phi cùng dầu lên trên, kho nhỏ lửa cho đến khi nước sánh lại.
5. Có thể rắc chút hành hoa và tiêu bột, ăn với cơm trắng.
Chú ý:
1. Món cá kho tộ được chế biến từ các loại cá béo càng hấp dẫn, đặc biệt là cá bông lau.
2. Khi trưng nước hàng không cần trưng cho đến khi có màu nâu sẫm, sẽ làm nước hàng bị đắng, và thiếu vị ngọt đường.

Wednesday, January 7, 2009

Pasta with Pork Ragu

copy from Chez Pim

Pici

After the holidays indulgences, I'm sure I'm not the only one craving something homey and comforting. And after all the religious pomp and circumstances we were exposed to -voluntarily or not- during that time, I guess I'm also not the only one with a hankering for a little rebellion. That's when an idea struck me. I knew just what I wanted to eat, Strozzapreti pasta.

Strozzapreti pasta is a traditional pasta shape from the Romagna region of Italy. The Italian name is literally priest-chokers in English. Legend has it that this particular shape, sort of resembling a short, twisted bit of rope, signified a religious rebellion in the region long suffered under Papal rule (from the 13th all the way to 19th century). Romagna housewives would cook this pasta for the local priests, in hope that they would choke to death as they scoffed it down greedily. A heretic pasta for my very own post-holidays rebellion, how perfect! To go with this pasta I made a ragu. You don't have to be Italian to find ragu homey, yes? This time my ragu would be made of pork, because why offend only one religion when you can easily do two (or three, actually)?

So that's what I had for dinner, a heretic pasta in a haram (or trefah) ragu. I must admit, however, that my rebellion was rather short-lived. It took me and two dear friends and neighbours Katy and Beccy nearly half an hour to roll just enough for the three of us for dinner -those Romagna housewives were seriously vindictive- so we quickly abandoned our hell-bound operation and turned the rest of the dough into Pici pasta, which are basically long, hand-rolled strips of slightly uneven thickness. The Pici are rustic and toothsome, not to mention much easier to deal with than Strozzapreti.

I was unable to find a good recipe for Strozzapreti online, so I grabbed my well-loved copy of Cooking by Hand to see what recipe I could adapt for it. I found the recipe for Pici, which was described as a "fat, hand-formed pasta from the countryside surrounding Siena." Since both Pici and Strozzapreti are hand-rolled, and Paul (as in Bertoli, the author) described this dough from this recipe as being a little bit softer, easier for hand-rolling, with a little olive oil to guard against sticking, it sounded just perfect for what I needed.

If you've never made homemade pasta, I highly recommend this recipe. You won't need specialty flour or equipment to make it. Trust me, it's really easier than you think.

Here's Paul Bertoli's recipe for Pici

12oz (about 4 cups) "Baker's Choice" flour, which is basically AP flour with a bit higher portein level. I used King Arthur AP flour
7oz (about 7/8 cup) cool water
3 1/2 tsp olive oil

The recipe, like many rustic pasta recipes, calls for putting the flour right on the countertop or pastry board, then make a well in the center and pour the wet ingredients into it, then, it suggests using a fork to slowly incorporating the liquid and the flour together. I strongly warn all but those with the dexterity of a monkey on crack against this method. The "well" wall will inevitably break, sending floury, sticky water streaming outwards and downwards like room-temperature lava stream.

Mixdough_3

What I suggest instead is measure your ingredients into a medium size bowl, then, with a fork, stir the ingredients together. You'll end up with a moist, lumpy, somewhat separated globs of incorporated dry and wet ingredients, which can be dumped onto the countertop without creating a mess. Work that dough a little, to get them to be a more or less cohesive dough. Don't worry about kneading or making a smooth dough right now, just wrap it with some plastic and let rest for half and hour. This is to let the flour absorb the moisture completely before you knead and roll.

Kneadingdough

After half an hour, unwrap the dough onto a well-floured board. Wash your hands in cold tap water, dry them thoroughly, dip them into your flour container to coat with flour. Knead the dough, pressing the base of your palm into the dough, pushing forward a little, then fold the dough into itself and again push down and forward with your hand. Make sure the board and your hands are always well-floured to prevent sticking. Do it until you get a smooth, soft lump of dough. This shouldn't take that much time at all.

Rolling

To roll into Strozzapreti shape, cut the dough into 8 pieces and roll each out thin, cut into about 3/4 inch wide and 3-4 inches long strips. Pick up each one and fold into half lengthwise, the roll gently between your hands to make a folded, slightly twisted piece of pasta. Place them on a well-floured cookie sheet, making sure they are not touching each other because they will stick badly.

Rollingpici

To roll into Pici, just cut out a small piece and stretch and roll it into long strips. Come on, we've all played with playdoh, I don't really need to teach you how to roll a dough into long strips, do it? Anyway, see the picture above for what it's supposed to look like.

If you plan to cook the pasta right away, make sure you cover the cookie sheets with kitchen towel (yes, well-floured to prevent sticking). If not, the pasta will be dry in places, which will make them cook unevenly. If you intend to make a large amount of past and will have enough time (at least overnight) to let the pasta dry thoroughly before you cook them, then don't bother with the towel.

Pork Ragu recipe coming tomorrow.

Tuesday, January 6, 2009

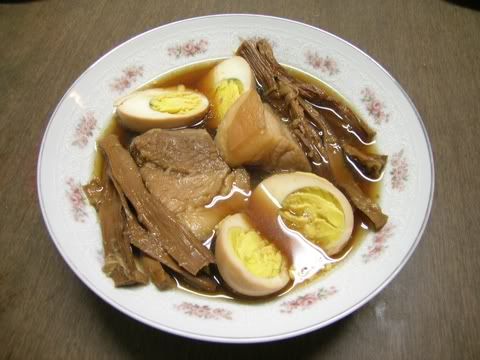
Thịt Kho Nước Dừa (Braised Pork in Coconut Juice with Eggs and Bamboo Shoots)

copy tu playing with my food

Ingredients:
-2lbs pork belly or shoulder
-5 eggs
-5 cloves garlic
-2 green onions
-3 tbs fish sauce
-4 tbs sugar
-1 tbs coconut milk or water
-coconut juice or water
-salt to taste
-bamboo shoots (optional)

What to Do:
Cut pork into small ‘chunks’. Boil and peel eggs. Crush and mince garlic and onions. Boil together coconut milk and sugar until golden brown; add garlic and onions give it a quick stir before adding pork and fish sauce. Lastly, add eggs and coconut juice. Simmer until pork tender add salt to taste. Add bamboo a few mins before serving. Serve with fresh herbs and dưa giá (pickled bean sprouts).

Canh Chua (Sour Soup)

copy tu playing with my food

Literally translated Canh Chua means sour soup. However the flavors carried by this soup are far more than just sour. There are many versions of Canh Chua the recipe below is the basic recipe. Adjust the ingredients to create what ever version you’re in the mood for.

Ingredients:
-1lb “meat” (see below)
-1 stalk Bạc Hà (taro stem)
-1/2lb bean sprouts
-1 stalk celery
-1/2 pineapple
-1 medium tomato
-1/3 lb okra
-tamarind soup base or sour tamarind
-fish sauce
-sugar
-salt
-jalapeño peppers (optional)
-cilantro
-basil
-ngò gai (saw tooth herb)
-ngò om (rice patty herb)
-fried shallots
-3 cloves garlic

What to Do:
If using fresh sour tamarind; soak tamarind in hot water (about 100g tamarind in 1 cup of water) for 1 hour and strain, use the “tamarind juice” to flavor the soup. Peel taro stem and slice into thin pieces. Slice tomato and pineapple into bite size pieces. Cut okra into half or into slices. Slice celery into thin pieces. Peel and mince garlic. Chop cilantro, basil, saw tooth herb, and rice patty herb.

Heat1 tbs oil in a pot and fry garlic until fragrant, add stir “meat”, and fish sauce stir fry for a few more minutes. Add water sugar, salt, and tamarind juice or tamarind soup base. Bring the soup to a boil and give it a taste test, all flavors (sweet, sour, and salty) should be the same. Add in veggies and bring the soup back to a boil before serving. Garnish with chopped herbs, jalapeno slices and fried shallots.

Meat Choices/Versions:
Canh Chua Cá Bông Lau (Cat Fish):
>>Use Catfish Slices

Canh Chua Tôm (Prawns):
>>Use prawns, with head if possible.

Canh Chua Gà (Chicken):
>>Use chicken breast or thighs.

Canh Chua Chay (Vegan):
>>Omit garlic, use tofu (fresh and fried), and straw mushrooms.

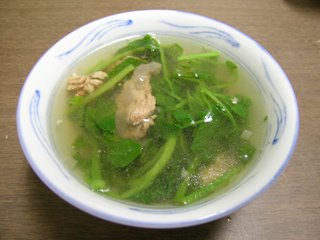
Canh Bò với Xà Lách Son (Beef and Watercress Soup)

copy tu playing with my food (Beef and Watercress Soup)

Ingredients:
-1/4lb beef
-2 bunches watercress (approx. 1-1 ½ lbs)
-pinch of 5 spice powder
-1 tbs Chinese almonds
-1 shallot
-salt, sugar, pepper

What to Do:
Pinch watercress into small pieces, wash and drain. Slice beef and shallots. Heat 1 tsp oil in a pot, add shallots and fry until fragrant, add beef, almonds, 5 spice powder and mix well. Add water and bring to a boil, add watercress, salt, sugar, and pepper to taste.

Monday, January 5, 2009

Lamb ragu for pasta

copy tu http://www.healthyfood.co.nz/recipes/2007/august/lamb-ragu-for-pasta

Lamb ragu for pasta

This is a delicious stew that can be used with pasta like parpadelle or fettuccine, served with mashed vegetables or put in a pie.

Recipe Information

Portions: 4

Time to make: 2 hours 30 minutes

Total cost of all ingredients: $14.00 / $3.50 per serve

Ingredients

  • 500g lamb shoulder, diced
  • 1 onion, chopped
  • 1 carrot, chopped
  • 1 kumara, chopped
  • 1 tablespoon olive oil
  • 2 cloves garlic, finely chopped
  • 1 stalk fresh rosemary (pull the leaves off the stalk and chop)
  • 2 leaves finely chopped fresh sage
  • few sprigs finely chopped fresh thyme or oregano
  • 250ml tomato purée
  • 1 cup red wine
  • 2 cups beef or chicken stock
  • 1 good handful fresh parsley, chopped
  • salt and pepper to taste

Instructions

Chop everything up and heat the olive oil in a large pot. Brown the meat all over, in batches if you have to, although I'm usually tempted to chuck it all in together and it seems to work okay that way, too.

Take the meat out and set aside, then put the vegetables in with a little more olive oil and cook until the onion is soft.

Put the meat back, add the wine, stock, purée and herbs (except the parsley). Bring it to a simmer, then leave to simmer away gently for a couple of hours, until the lamb is tender and the smell is making everyone salivate. Add the parsley in at the end and save a bit for sprinkling over the top.

While it's cooking, you can make pasta! Or use bought stuff, and serve with a sprinkle of olive oil and lots of parmesan and black pepper.

Recipe by:
Niki Bezzant
Styling:
Niki Bezzant
Photography:
Joanna Wickham