ingredients
• 4 chicken legs, preferably higher welfare
• a bunch of fresh coriander
• 2 sticks of lemon grass
• zest and juice of 2 limes
• 1 green chilli, deseeded
• 2 tablespoons sunflower oil
• a thumb-sized piece of ginger, grated
• 3 cloves of garlic, peeled
Slash the chicken legs all over with a knife. Pick the coriander leaves and put them to one side. Add the stalks to a food processor with the rest of the ingredients and whizz to make a paste. Rub the paste into the slashes and all over the chicken legs. Place in a snug-fitting tin to marinate and light the barbecue. Place the roasting tin on the edge of the barbie so the chicken starts to cook gently without starting to colour too much. When the legs are about half cooked, take them out of the tray and place them directly on the barbecue. Grill, turning now and then, until cooked through and crispy brown on the outside. Sprinkle the coriander leaves over to serve. Tip: Grill the chicken on the medium-hot bit of the barbie, so it has a chance to cook before it crisps up.
Showing posts with label Thai food. Show all posts
Showing posts with label Thai food. Show all posts
Tuesday, April 26, 2011

Tuesday, August 11, 2009
Thai cucumber salad (Yum Tang Gwa)
http://www.chezpim.com/blogs/2009/08/thaicucumbersalad.html

I picked four fat cucumbers from my garden the other day. This is my first time growing cucumbers - in fact my very first time growing a garden of my own. I've never before tasted cucumbers this fresh from the plant. They were crisp, sweet, and perhaps - no, definitely - the best cucumbers I've ever tasted. I am sure these cucumbers are the best tasting in the same sense that my cat (or your dog, or your kid for that matter) is the cutest thing ever. But hey, why burst our bubble?
Anyway, since these cucumbers were the best ever, I couldn't possibly just use any recipe for it. I grew these babies with blood, sweat, and tears. Ok, not really, I put the starter plants Cynthia gave me into the grown and gave them water and they practically grew themselves. Hmm, now where were we, oh, yes.. growing them with blood, sweat, and tears - or just dirt and water, rather - I wanted something special the celebrate them. A little bit of tinkering in the kitchen produced this recipe, a salad of crisp cucumber slices. It's not exactly Thai, but the inspiration certainly is from that general direction.
The dressing here is a classic Thai blend of lime juice, fish sauce, chilli, and a pinch of sugar. I don't want the lime juice to be so pronounced and to overpower the brightness of the cucumbers, so I use a little less and temper it with a bit of rice vinegar. If your fish sauce is old and getting quite stinky, I suggest using a bit less and adding some salt instead as well. You want the dressing to be light, bright, and delicious, not stinky, sharp, and muddy, so be careful. A little bit of herb gives the salad a lovely complexity, so I suggest Tia To or Vietnamese Perilla if you can find it (regular Shiro leafs or just plain mint will do in a pinch), and also a bit of cilantro. Finish the salad with a generous sprinkle of toasted coconut flakes and fried shallots, and there you have it. The salad in the picture has some poached shrimp in it, since I had that for lunch and thought I needed a little protein. You can skip it entirely, or use poached chicken torn into strips, or tofu, or nothing at all.
Oh, you want a recipe, that was it. Ha. Ok, not really.
Thai cucumber and shrimp salad
(served 4 as a light-ish lunch, and more as part of a meal)
2 large cucumbers (about 2 cups)
2/3 lbs shrimp, preferably shells on (optional, but remember to add more cucumber if you're not using any protein at all)
about 1/4 cup of roughly chopped Vietnamese Perilla (use more or less to taste)
about 1/4 cup cilantro leafs (ditto)
1 cup of shallots, cut into thin slices
1/4 cup of coconut flakes (desiccated coconut)
For the dressing
about 1/4 cup fish sauce
3 tablespoons lime juice
about 2 tablespoon rice vinegar
about 1 tablespoon of palm sugar (white sugar will do just fine, but start with only 1/2 tablespoon)
5-10 Thai bird-eye chilli, chopped (to taste)
In a small pot, add 1/2 cup of water and the shrimp. Place the pot with the lid on over high heat, bring it to a boil. As soon as the water comes to a full boil, turn the heat off and let the steam finishes the cooking for a couple more minutes. Drain the water and let the shrimp rest until they are cool enough, then peel and devein them and set aside.
Peel, seed, and cut the cucumbers into thin slices.
Place a dry wok over low heat, add the coconut flakes and stir constantly until they are evenly brown. Set aside. Wipe the wok clean, add 1 1/2 cup of frying oil into it and place it over medium heat. When the oil is hot, add the shallot slices and fry, stirring occasionally, until brown and crisp. Be careful not to over cook them. Fish out the fried shallots from the pan ontp a plate lined with paper towel and set aside. You can strain the oil and keep it for another use. The perfumed oil will be perfect for a stir-fry, for example.
To make the dressing, first you nuke the palm sugar (in a bowl in the microwave) for 20-30 seconds just to melt it and make it easier to blend with the other ingredients. Then add the fish sauce, stir to blend. Add the lime juice, then the rice vinegar. Taste it and see if you need more acidity, if so, add more rice vinegar to taste. Add the chopped chilli.
In a salad bowl, add the shrimp and cucumber slices. Reserve a bit of the fried shallots, coconut, and the herbs for garnish. Dump the rest into the salad bowl. Pour in about 2/3 of the dressing, toss well. Taste it and see if you'd like a bit more dressing, then add more as needed. Sprinkle the reserved shallots, coconut, and herbs and serve.
A great trick for egg lovers

I love to serve this salad with a boiled egg on the side. I boil the eggs just until the white is set but the egg is still somewhat gooey. This is a bit tricky to do, as it depends on how hot your stove is and a lot of other factors, but generally what I do is this: I put 4 eggs, cold right from the fridge, into a 2-3qt. pot. Fill it with enough water just to cover the eggs. Put the pot on the stove over medium heat, lid off. Set the timer to 11 minutes. Just before the 11-minute mark, I fill a bowl with water and ice, to wait for the eggs. As soon as the timer rings, remove the eggs from the pot, put them into the ice water bath. When the eggs are cooled enough, peel them gently under running water.
I cut each egg into halves and serve 1 egg per serving if it's for lunch, and just 1/2 if it's a part of a meal.
Before I eat, I use the fork to crush the egg, then stir to mix into the salad. The partially cooked yolk basically dissolve into the dressing and slightly thickens it. It's beyond perfect, to me at least.
Tuesday, March 17, 2009
Thịt bò xiên nướng
http://cookingand.blogspot.com/search/label/m%C3%B3n%20Th%C3%A1i  Thịt bò kiểu này gọi là thịt bò satay của Thái, ăn kèm sốt bơ lạc và rau củ tươi
Nếu mà có chỗ nướng thịt trên lửa than thì ăn càng thơm ngon, không thì nướng trên chảo nướng (Grillpfanne - 1 cái chảo gang có tạo hình lưới hoặc sọc nổi trong lòng chảo) hay lò nướng nhưng chảo và lò phải làm thật nóng và nướng nhanh thì thịt sẽ không bị khô
Nguyên liệu: (4 người)
500g thịt bò filet : đập miếng thịt bò cho mềm bớt, cắt miếng vuông 1cm
2 tép tỏi đập dập
1 khúc nhỏ gừng, mài vụn hoặc băm nhuyễn
1 thìa đường thốt nốt/Palmzucker
1 thìa nước tương
1 thìa nước chanh xanh
2 thìa dầu vừng đen
1 thìa cafe rau mùi tươi băm nhuyễn hoặc khô (gemahlener Koriander) có bán sẵn trong lọ đồ khô
1 thìa cafe bột nghệ/Kurkuma
1/2 thìa cafe ớt bột
Trộn đều thịt bò với các gia vị trên, đậy kín để tủ lạnh ít nhất là 2 tiếng, để qua đêm thì càng tốt.
Sau đó đem ra xiên vào các que tre và nướng 3-5 phút, thịt chuyển màu vàng nâu là được. Khi nướng thường xuyên trở thịt cho chín đều các cạnh.
**Để que không bị cháy thì ngâm que trong nước lạnh trước khi xiên thịt hoặc để que tre trong tủ đá
Ăn kèm: dưa chuột và ớt chuông thái nhỏ
và sốt bơ lạc:
300ml nước cốt dừa
8 thìa bơ lạc
1/2 củ hành tây nhỏ băm nhuyễn
2 thìa đường thốt nốt
1/2 thìa cafe ớt bột
1 thìa nước tương
tất cả nguyên liệu làm sốt đun sôi trên lửa vừa. Giữ ấm đến khi ăn

Thịt bò kiểu này gọi là thịt bò satay của Thái, ăn kèm sốt bơ lạc và rau củ tươiNếu mà có chỗ nướng thịt trên lửa than thì ăn càng thơm ngon, không thì nướng trên chảo nướng (Grillpfanne - 1 cái chảo gang có tạo hình lưới hoặc sọc nổi trong lòng chảo) hay lò nướng nhưng chảo và lò phải làm thật nóng và nướng nhanh thì thịt sẽ không bị khô
Nguyên liệu: (4 người)
500g thịt bò filet : đập miếng thịt bò cho mềm bớt, cắt miếng vuông 1cm
2 tép tỏi đập dập
1 khúc nhỏ gừng, mài vụn hoặc băm nhuyễn
1 thìa đường thốt nốt/Palmzucker
1 thìa nước tương
1 thìa nước chanh xanh
2 thìa dầu vừng đen
1 thìa cafe rau mùi tươi băm nhuyễn hoặc khô (gemahlener Koriander) có bán sẵn trong lọ đồ khô
1 thìa cafe bột nghệ/Kurkuma
1/2 thìa cafe ớt bột
Trộn đều thịt bò với các gia vị trên, đậy kín để tủ lạnh ít nhất là 2 tiếng, để qua đêm thì càng tốt.
Sau đó đem ra xiên vào các que tre và nướng 3-5 phút, thịt chuyển màu vàng nâu là được. Khi nướng thường xuyên trở thịt cho chín đều các cạnh.
**Để que không bị cháy thì ngâm que trong nước lạnh trước khi xiên thịt hoặc để que tre trong tủ đá
Ăn kèm: dưa chuột và ớt chuông thái nhỏ
và sốt bơ lạc:
300ml nước cốt dừa
8 thìa bơ lạc
1/2 củ hành tây nhỏ băm nhuyễn
2 thìa đường thốt nốt
1/2 thìa cafe ớt bột
1 thìa nước tương
tất cả nguyên liệu làm sốt đun sôi trên lửa vừa. Giữ ấm đến khi ăn
Thịt viên kiểu Thái
http://cookingand.blogspot.com/search/label/m%C3%B3n%20Th%C3%A1i

*400g thịt làm được viên to cỡ 2 ngón tay. Nếu làm khai vị thì chia thành 12 viên
Nguyên liệu: (4 người ăn)
400g thịt lợn xay
4 thìa cơm nguội
1 tép tỏi đập dập
1 thìa cafe currypaste Thái màu đỏ
1 thìa cafe hạt tiêu xay
1 thìa cafe hạt mùi xay (hạt ngò)
1/2 thìa cafe muối
2-3 thìa nước chanh vắt (chanh màu xanh)
2 thìa rau mùi(ngò) băm nhỏ
3 thìa dầu lạc
nước tương để chấm thịt
Cách làm:
1. Dùng tay trộn lẫn tất cả các nguyên liệu (trừ dầu lạc và nước tương) thành một khối đều mịn
2. Viên thịt thành 12 viên đều nhau
3. Đun nóng dầu trong chảo, để lửa vừa, rán vàng các viên thịt các cạnh cho vàng đều (khoảng 8-10 phút).
4. Dùng nóng với nước tương
Monday, December 15, 2008
Thai-marinated fried chicken
copy from Chezpim

If you've been to Thailand, you've seen those fried chicken carts at practically every street corner, with the giant wok smoldering like a witch's cauldron filled with dark, smelly oil that seems as ancient as the broken down cart itself. What those carts produce are the bright, bright gold, impossibly crisp, mind-blowingly flavorful pieces of fried chickens, so good you willingly suspend all your hygienic concerns. Who cares how long those chickens lingered in the tropical heat with only the dodgiest "refrigeration", who gives a damn about how many times the oil has been re-used. I'm going to take a big bite and let that crisp, garlicky, chicken-y goodness shatter into a million little pieces in my mouth and just die happy. Wouldn't you?
Luckily, you won't need to hop on a plane - or get a special dispensation from your doctor - before you can eat one. I've figured out how they're made. And it's so very simple. The trick is, let me just come out and tell you, rice flour. You dredge the chicken pieces in rice flour, that's what give them the crispiest skin. I also marinate them in a paste made with garlic, oyster sauce, and fish sauce to give them a bit extra kick in the flavor department.
I just made a batch of this for lunch on the boat yesterday. They were still a little crisp (and still dee-lish) even after a few hours in a cold box. I'd show you a picture but we devoured them all before I could get the camera out from the cabin...
Thai fried chicken, or, the crispiest fried chicken ever
8-10 pieces of chicken, drumsticks or thighs, or both (a little over 2lbs or 1kg)
4-6 cloves of garlic, peeled
about 1 tbsp of chopped cilantro roots (or just the bottom part of the stalks)
about 1/2 tbsp ground black pepper
1 tsp kosher or (large-grained) sea salt (If all you have is fine salt, skip it.)
3tbsp oyster sauce
1/4 cup fish sauce
Enough canola oil or other high-temp oil to fill about 2-inch from the bottom of your cast iron pan (or a deep frying pan)

In a mortar or a small food processor, pound or chop the garlic, cilantro roots, kosher salt into a rough paste. Transfer the paste into a large bowl, add the oyster sauce and fish sauce and stir to mix well. Rinse and dry the chicken pieces thoroughly, then place them into the bowl. With your hands, toss and rub the chicken pieces all over with the marinate mixture. Cover the bowl with plastic and let marinade in the fridge for at least 3 hours.

When you are ready to cook the chicken, place your pan over medium-low heat, fill it with enough oil (I used Canola) to cover about 2inches from the bottom of the pan, or about half way up the side. Let the oil come up to frying temperature, about 360F or 180C. Meanwhile, put about 2 cups of rice flour into a large plate (a pyrex pie plate works very well for this.) When the oil is ready, take the chicken pieces, one at a time, drop it into the flour plate and coat well with the rice flour. Shake each piece once or twice to remove excess flour and place them, gently, into the hot oil.

If you don't have a thermometer, make sure your chicken pieces only gently sizzle in the hot oil. Just listen to it, you should hear the oil just softly sizzling. You should also see small bubbles around the chickens as they cook. If the oil is too hot, you'll be able to see and hear it too. There will be a lot of large bubbles blowing up and spitting viciously. It will make a lot of violent noises and your chicken will brown up in just a few minutes, but the inside will be rare. That's no good. Just keep the flame low, and, when in doubt, turn the heat down just a little bit.
Cook the chickens until brown and crisp all around. If you're not so sure if they are cooked perfectly, cut one up and see if it's cooked all the way through. If you see a little blood, no big deal. Just warm up the oven to about 225F or 100C, place your fried chickens on a cake rack over a cookie sheet and let them sit for 10 minutes to finish cooking. (Don't forget to lower the heat on your frying pan so the rest of your chickens take a bit longer to cook!) It's a good idea to heat up your oven to that temperature before you begin frying anyway, you can put your cooked chicken pieces in there while you fry the rest. The oven will keep everything nice and warm, not to mention super crispy.
Pad Thai
copy from Chezpim
Pad Thai is one of the most popular Thai dishes, perhaps second only to Tom Yum Goong. It's also one of the most requested recipes here on Chez Pim. Why, then, has it taken me this long to post this recipe, you asked? I don't know...perhaps it's because I don't actually have a recipe! Is that a good enough reason?
Then what am wasting your time for, you are wondering, yes? Well, it's true that I don't have a recipe, but what I have, and will share with you here, is way better than a recipe. It's in fact a fool-proof way to make Pad Thai -Pad Thai for just about anyone from beginners to experts. I must warn you that I will a bit wordy. I could easily write a very short description and make everything look and sound easy -but that means I'd be leaving you to figure out the details on your own. Or I could explain every step of the way so that you understand what goes into a Pad Thai and what distinguishes a great one from the usual blah. The piece might look a little intimidating, but I think it will in fact be easier than any easy-looking recipe. And, I promise you, if you read through the entire thing, you'll never have to look at another Pad Thai recipe. You'll be set. Really you will.
There are so many silly Pad Thai recipes around, a quick google reveals one with ketchup as an ingredient. What an abomination! Not even the fabulous June Taylor's artisanal ketchup can rescue that one! A few other recipes I came across would have us make four or more portions of Pad Thai at once –which, I can guarantee you will result in clumps of oily, sticky noodle unfit for human consumption.
The textures and flavors of a proper Pad Thai derive largely from the way the dish is cooked, that is to say its quick footloose dance in an ultra hot wok. That simply means you can't do many servings at once.
No, no, I'm not going to make you drive around town procuring all the exoticities required to make a proper Pad Thai only to feed just you and your sweetheart. It is entirely possible to feed a whole crowd. You just have to do it like they do on the streets of Bangkok -cook one or two portions at a time. Your friends and dinner guests must be a bit patient, but they will kiss you in the end –no, not the rear end, just the end of your party, get your mind off the gutter you!
Another common mistake in a Pad Thai recipe is to season while cooking in the wok, which once again get in the way of that super-heated wok-quickstep I mentioned before. If you follow those recipes that have you measure a tablespoon of fish sauce and one of tamarind and yet another of palm sugar into the hot wok during the cooking, you are –it pains me to say- doomed to failure. By the time you're done adding all the whatnots, your noodle turns gooey, your protein done to the texture of a rubber eraser, and your perfectly innocent Pad Thai becomes what I call a sorry excuse of the dish. Bad all around.
Once again a little street sense can help a whole lot. Pad Thai vendors in Thailand don't season their Pad Thai one portion at a time. They usually have a giant vat of sauce pre-made waiting patiently by the wok station. As they cook a portion they add the sauce -no guess work, no fumbling with this bottle and that, a ladle full of the pre-seasoned sauce and that's it. Easy enough, yes?
That's how I do it. I make my sauce beforehand. I don't even care if I make too much sauce, since it keeps quite well in the fridge for a long time –comes very handy for a quickie Pad Thai fix later. I also prepare all the other ingredients and have them ready. (You can be fancy and call it mise en place like the French do, or just a simple meez like all the American cooks I know.) When my guests arrive I get the wok smoking hot and make one or two portions at a time until everyone has their fill of the noodle-y goodness. They can even take the wok on a spin and make one on their own. My friends get a kick out of that, yours might too.
So you begin by preparing the sauce.
There are four ingredients in the Pad Thai sauce, Tamarind pulp (for the sour flavor), Fish Sauce (for the salty part), Palm Sugar (for a slight sweetness), and Paprika or Thai chilli powder (for the spice). Two cups of sauce will make about 6-8 portions of Pad Thai. You can make your Pad Thai sauce vegetarian by using this sauce instead of fish sauce.
To make about two cups of sauce, you should begin with about ½ cup each of Tamarind (*see the note below for how to prepare tamarind pulp - I mix about 60gr tamarind pulp with about 1.5 -2 cups of water but then I need to use about 1 -1.5 cups of tamarind), Fish Sauce (I used 1/4 cup Fish sauce), and Palm Sugar. If you substitute white and/or brown sugar for the Palm Sugar, you should use only about 1/3 cup. Melt all these together in a small pot over a low flame. Taste and adjust the flavor balance until it suits you. Then add the chilli powder, begin with a teaspoon or two, depending on your taste, and keep adding until it tastes the way you like it. By the time you're done flavoring the pot should be simmering happily. Turn off the heat and let the sauce rest while you get to the other ingredients.
At this point in the game I like my sauce to lead with a salty flavor, follow by a mild sourness, then just a gentle sweetness and a soft caress from the chilli at the back of my throat at the very end. A finished plate of Pad Thai will be served with a sliver of lime and extra chilli powder to be mixed in at the table, so you could keep these two flavors in the sauce mild for now. I don't know about you but there is nothing I hate more than a cloying sweet Pad Thai. If your sauce starts out super sweet now it will be very tough to correct later.
Those of you with a scientific mind might want more precise measurements or proportion or whatnot. I'd do it if I could, but the problem is most Thai ingredients are not standardized in the way that a Western ingredient, say, white granulated sugar, is. A cup of granulated sugar is always the same, but a cup of your Palm Sugar or Fish Sauce might not have the same intensity as mine. So the easiest thing to do is just to taste. And herein lies another beauty of preparing the sauce ahead of time. You can take your time to taste and adjust the sauce precisely to your liking, which would be hard to do à la minute in the wok.
Now that you have your sauce ready and waiting, you can prep the other ingredients.
Here's a list of what you need, and the quantity to use per portion.
Thin rice noodle, also called Rice Sticks.
Get them fresh if you can find them at your nearby Asian markets. If not, buy dried noodle and soak in warm water until soften. Don't soak until the noodle is soft enough to eat, or it will turn into mush in the wok. Just do it until it's pliable, then drain well. You will need about 1-2 loosely packed cups per portion, depending on how carb-happy you are. You can use more or less, entirely up to you and your friends. A 500g (or about 16oz) bag of dried noodles should be enough for 6-8 portions. Buy a little extra just to be sure. It's cheap and, if left unsoaked, will last just about forever.
Depending on the freshness of your 'fresh' rice noodle, you might want to soak it anyway just to soften it a bit more. Follow the same step as the dried noodle but do not soak for as long. One normal bag of fresh noodle, usually around 500g, will be enough for 3-4 portions.
Shrimps, or chicken, or for vegetarians see under 'Tofu' below
The more traditional version of Pad Thai uses shrimps. I use about 7 pieces of medium size shrimps per portion, peeled of course. You can be as generous as you want.
You can also easily substitute chicken, about 2oz of chicken meat (cut into bite-size pieces) per portion will be plenty.
Tofu
(For 2 portions, I used 2 carrots. It adds some crunchy texture) I like to use the pressed tofu that comes in square blocks. You can use just about any firm-textured tofu you can find, even the pre-fried varieties from Chinese markets. As long as it doesn't disintegrate when fried in the wok, you will be fine. I cut the tofu into thin, bite-size pieces, and use about a small handful in each carnivorous portion. For a vegetarian portion, with only tofu and no other meat, you will have to use more. A little guess work is involved here but it's easy enough, yes? (To make it completely vegetarian, you can use this sauce in place of fish sauce.)
Eggs
I usually crack one small egg into the wok while cooking each serving. If you dinner guests like less egg you can make two servings at a time and only crack one egg into the wok while cooking, essentially cutting the egg quantity in half in each portion.
Ground Peanuts
(I used roasted almonds - put almonds in the 150C oven, stirred once or twice, until it has nice smell and browner color) instead of peanuts because my boyfriend can't eat peanuts) I use roasted and unsalted peanuts (sometimes I roast my own) for this. Ground the peanuts roughly, beware not to overdo it as you will end up with peanut butter and not ground peanuts. You will need 1-2 tablespoons per portion, depending on how much your friends like peanuts.
Flat-leaf Garlic Chives, also called Chinese Chives
Bai Gui-chai as they are called in Thai. Although most restaurants use the green part of green onions or spring onions, Garlic Chive is the more traditional herb for Pad Thai. Wash and dry the chives carefully, then cut into 2 inches pieces. I use a handful of them per portion.
Beansprouts
I love a lot of beansprouts in my Pad Thai, so I use almost a full cup per portion. You can use as much or little as you like. You can even skip them entirely.
Pickled Turnips (optional)
You can buy pickled turnips pre-chopped in a plastic bag, but I think the whole ones are fresher. I chopped whole turnips into small bits, and use about 1 tablespoon per portion.
Dried shrimps (optional)
The cheaper versions of Pad Thai on the streets of Bangkok are made with only tiny dried shrimps and no fresh ones at all. I don't want to go that far, but I still like to add a bit of these salty dried shrimps for extra flavor -you can easily skip it altogether. I take a bit of dried shrimp and pound in a stone mortar and pestle until fluffy. It's important to use the mortar here and not your cuisinart, which will turn to dried shrimp into hard, dried chunks (entirely capable of cracking a tooth) instead of fluffy bits of salty shrimp. I use about 1-2 tablespoon per portion.
Chopped garlic (optional)
I like to use a little bit of garlic in each portion, give it an extra kick. You don't have to.
To serve as condiments at the table you will need:
Slivers of lime, extra ground peanuts, extra chilli powder, fish sauce, and even a bit of white sugar. Just like other street food in Thailand, everyone can tailor the final dish to their own taste. I suggest a squeeze of lime for sure, and anything else that pleases you.
Toast yourself with a glass of champagne now that the prep is done before your dinner guests arrive. A nice off-dry and not oaky champagne will go well with the Pad Thai later too. Lovely Rieslings will do fine as well.
While you're savoring your champagne, let me tell you a bit about that temperamental beast that's your well-seasoned wok (**see note below). The success of your Pad Thai depends on it. A wok is not built for heat retention or long and even cooking, unlike Western style pots and pans. A Le Creuset pot, for example, is built like a marathon runner, slow to warm up but has a long staying power. A wok, on the other hand, is more like a sprinter. It heats up really fast, and loses it just as quickly. The thin iron steel material in a good wok transfers more or less all the heat from the flame directly to the content inside. This is great for the ability to control heat, you can turn the fire up and down and the heat in the pan will rise and fall just as quickly. This also means that a wok can sear and cook a small amount of food lightening fast. Adding too much all at once and letting the heat escape would turn a wok into a useless piece of tin in a blink of an eye. And since the caramelization and charring from a hot wok is where the wok-flavor, or wok-breath as some call it, comes from, your utmost goal in wok-cooking is to start out hot and keep it hot! Make sure that all your ingredients are at room temperature, and that you add them in sequence and let the wok reheat back up before each addition. At no time should you add a huge amount of ingredients all at once, unless you want a Pad Thai stew.
Now you are ready to make a Pad Thai.
Follow these steps carefully and the best Pad Thai you've ever had will be the one you've just made! Keep the sauce pot warm on another burner next to your wok. Keep a bowl of water handy too, if things get to hot in the wok you can sprinkle the water on it to slow it down.
- Heat a large wok over high heat until very hot, to the point of smoky.
- Add a splash of oil, about 3-4 tablespoons. Don't be shy, this ain't no diet food.
- (I cook carrots or about 30 seconds in this step) If you are making chicken Pad Thai, add the chicken first, cook, stirring vigorously, until it's half way done, about 1-2 minutes, then add the tofu, a tablespoon or two of the sauce to flavor the chicken, and a pinch of garlic if you're using it. If you are making tofu or shrimp and tofu Pad Thai, then only add the tofu (and garlic) for now. Cook for another minute until the tofu is crisp and slightly brown at the edges.
- Add the noodle, about 2 loosely packed cups for one portion is my standard, and then a ladle (about ¼ cup) of warm sauce. Stir rigorously, keep everything moving in the wok, and cook the noodle until soft. Remember to break up the noodle and don't let it lump together. If the sauce evaporates too quickly and your noodle isn't quite ready, sprinkle a bit of water and keep stirring. Add a bit of oil if the noodle still stubbornly sticks together. As I said, this ain't no diet food.
- When the noodle is ready (taste it to be sure), push it up to one side of the wok and crack an egg into the middle. Let it set for 10-15 seconds and toss everything all together.
- Add the shrimp meat, pickled turnips, ground peanuts, ground dried shrimp, beansprouts. Keep things moving. Add more sauce if it looks a little pale.
- When the shrimps are done, shouldn't take more than a minute, add a handful of Garlic Chives. Turn the heat off, and quickly give the wok a good stirring to mix everything together.
- Add the finished Pad Thai to a plate and serve to your first lucky dinner guest. Give the used wok a quick rinse with warm water, wipe off any excess bits of food with a warm towel, then put the wok back on to the fire.
- As soon as it heats back up to a smoking point, you're ready to do another portion. Repeat this process until all your dinner guests are fed. Keep them lubricated and happy with ample supply of Riesling, Champagne, and/or beer while they wait. That's how I do it!
That's it friends, your lesson in Pad Thai. It's a bit long, like I said, but this will be the last thing you'll ever need to read about Pad Thai. You might never go out for Pad Thai again, even!
So, go on, throw your own Pad Thai party. Your friends will love you (even more.)
-----------------------

*A note on tamarind:
You can buy tamarind in blocks or readymade pulp that comes in plastic or glass containers (see the photo above). If you can't find a local market that carries tamarind you can order it online. If you buy readymade pulp, check to make sure that the ingredients only contain tamarind and water, no sugar or anything else. If you buy block tamarind, soak the block in 4 cups of hot water in a large bowl. Mesh the tamarind and water together and let sit until the water cool down enough not to burn your hands. Stick your hands -your impeccably clean hands as Julia Child would say- into the bowl and work the tamarind and water together until the consistency is a bit looser than room-temperature ketchup. Add more warm water if needed. Then, strain the mixture to remove the pits and tough membranes from the tamarind pulp. The consistency will be thick enough that you'd need to press it through the strainer. Use as much as you need for the Pad Thai sauce and keep the rest in a glass jar in your fridge. You'll have tamarind pulp handy for a long time.
This recipe is highly adaptable. Some people don't like the intensity of tamarind. Fine, just use less tamarind and add simple white vinegar til your desired sourness (pun intended). You won't be able to get rid of tamarind all together. Without it your Pad Thai won't be much of a dish, but you can use about half the tamarind I use and supplement the rest with vinegar.
**A well-seasoned wok
First of all, you'll need an iron steel wok -the cheapest kind made of a thin layer of iron steel that's sold in practically any Chinese market. There's no need to buy anything fancy, mine was less than $15 and it's working out great. You just have to keep it well-seasoned and it will last practically forever.
At any point in the making of this superb Pad Thai, if anything sticks to the pan and won't come out easily with a gentle push of a metal spatula, your wok isn't well-seasoned. No, no, you don't have to rush out to buy a replacement. You just have to season it again.
There are plenty of ways to season a pan, here's how I do it. First, add to your wok one cup of oil –make sure you brush the oil over all the inside surface of the wok- and heat the wok until it is smoking. Tilt the pan around to keep lubricating the surface with oil and let it continues to smoke for a few minutes –make sure your smoke vent is running and all the windows are open, by the way. Then, take the pan off the heat and dispose of the oil. Pour half a cup of kosher salt into the wok and, with a kitchen rag, rub the salt all over the inside surface of the wok. Throw out the salt, wipe the wok clean with a damp towel. Pour a small amount of oil into a paper towel and wipe the oil all over the inside surface again. Your wok is now seasoned and ready.
Nam Prik Pao
Nam Prik Pao (น้ำพริกเผา) from Chezpim

75g whole dried chilli, substitute about 7 tbsp chili powder
100g garlic, about 2 medium heads
150g shallots, about 5 medium shallots
1 cup, 250ml oil
100g palm sugar, about 10 tbsp, chopped
2 tbsp Thai shrimp paste
1/3 cup tamarind pulp*
3 tbsp fish sauce
1/4 cup water
First you prepare the ingredients
Set a wok over medium heat. When the wok is hot, add the dried whole chilli. Stir vigorously, until the chilli pods begin to smoke and burn in places. (Be careful with this step or you might burn your eyes with the smoke, or worse yet, cause a terror alert or something.) Remove the chili from the heat. Set aside until cool enough to handle.

Add 1 cup of oil into a wok over a medium heat. When the oil is hot, add the garlic slices. Keep stirring to make sure that all the garlic are cooked evenly. When the garlic turn light golden brown – don't let them turn too dark now as they will continue to cook a bit more off the heat - use a colander to fish out all the garlic flakes. Set aside.
Add the sliced shallots into the remaining oil in the pan. Cook until they are golden brown, stirring frequently to prevent hot spots. When the shallots are done, turn the heat off, fish the fried shallot flakes out with the colander and leave the oil in the pan. Set aside.


Prepare about 1/2 cup of tamarind pulp. (I've already explained how to prepare tamarind pulp in a post on Pad Thai.) You may not need to use the whole amount, but it's good to have a little extra.
Now you make the Nam Prik Pao

Set the wok with the remaining oil back over medium high heat until hot. Form the shrimp paste into a ball and flatten it slightly. Fry the shrimp paste in the hot oil for one or two minutes until fragrant.
Add five tablespoons of chilli powder, stir well to mix. Then, add the ground garlic and shallots, tamarind pulp, fish saunce and chopped palm sugar, mix well. Add the water, and stir well. Taste the mixture and adjust by adding more sugar, tamarind, or chilli as needed. The flavor should be sour, sweet, salty, and with a good smoky and spicy note at the end. (Despite what you might have heard, Nam Prik Pao is not supposed to be fiery hot.)
Turn the heat down to simmer and let the mixture simmer until reduce a little bit, to the texture of loose jam. Don't reduce it too much at this point as it will thicken as it cools.
Transfer the Nam Prik Pao into an airtight container – I love to use old jam jars for this. Nam Prik Pao will keep in the cupboard for a few months.
What does one do with Nam Prik Pao, you asked? Well, if you are like me you eat it spread like jam on white toast for breakfast. Make your significant other eat it too or it'll just be the end for you two. You can make Tom Yum Goong with it, or use it as a base for spicy stir-fries.Wednesday, November 19, 2008
Pan Fried Young Tofu
Copy from Godknows
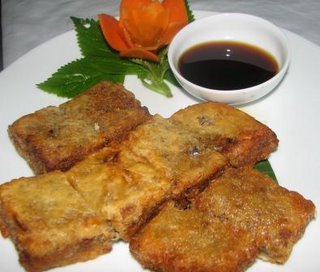 You might think that this is just normal tofu which people sell in the market. I can guarantee that this is one of the greatest vegetarian dishes that you could ever try. It takes time to make this tofu but it's worth it for special occasions. Check out the following recipe.
Ingredient:
Rice powder : 2 bowls
Green bean :300gr
Corn flour:1 bowl
Tofu :5 pieces
Black mushroom :300gr
Onion : 2
Water :20 bowls
Oyster sauce, soya sauce, Knorr powder, pepper, oil.
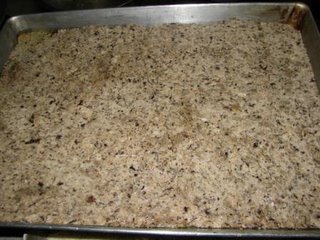 How to make:
Black mushroom, onion: chopped finely
Green bean : cooked then ground.
Put all together and mix up, cook until all the moisture has almost evaporated. Scoop out into a tray, divide them into small square pieces and store in the freezer. Take them out and deep fry, at first over a low heat after covering them lightly in flour. Turn the heat up slowly once they are browned slightly. Must be eaten hot and crispy with soya sauce(chili).
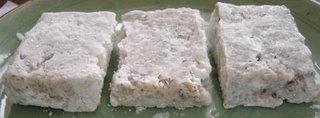 This is a really special vegetarian dish that everyone loves at Wild Rice, especially foreigners.
Tom yum soup
- Tom yum soup
-
Sau bao lan thu lam mon nay theo cong thuc tren mang, mua sach day nau mon an Thai ma van chua lan nao to thay thanh cong. Hom T5 vua gio tinh co nhìn thay cong thuc mon nay trong sach Cooking cua James Peterson...nen lap tuc thu luon. Moi dau thi hoi nghi ngo vi ong nay lam j biet j ve mon an Thai dau..nhung ke cu thu lam...ai ngo lai ngon nhat trong tat ca cac cong thuc to da thu lam :=) to post ra day de share voi moi nguoi nhe:Nau theo cong thuc nay thi dc 1 noi sup cho 2-3 nguoi an
Thanh fan:
2 red Thai chiles
3 cloves garlic, finely chopped (hoac cho vao ma'y say)
2 shallots, minced
2 slices fresh ginger, 0.5cm thick
4 kaffir lime leaves (la' chanh), cut into fine shreds
3 stalk lemon grass, discard tough outer layer, very thinly sliced
0.5kg shrimps
1 bunch of cilantro, large stems removed
1/4 cup fish sauce, or more to taste
Juice of 3 limes
Pepper
Cach lam:
1. Cho tôm, chua bo'c vo vào noi nuoc (6 cups water) luô.c cho soi rô`i simmer (tuc la nc ko soi sùng suc ma nuoc chi la(n ta(n) khoang 10' thi bo? tôm ra. De tôm nguoi roi bo'c vo.
2. Trong luc luoc tôm, to cho chiles, garlic, shallots, lemongrass, lime leaves, ginger vao may xay roi xay cho that nhuyen (do to ngai ba(m garlic, shallot cac thu)
3. Cho toan bo cho paste vua xay day vao chao xao voi it oil cho that tho*m. Khi tôm luoc xong thi do cho vua xào vào nô`i, cho no' simmer khoang 12'.
4. Trong luc doi noi nuoc simmer thi bo'c vo tom ra, vut vo di hoac cho vào tu'i co' kho'a roi freeze; de luc nao can shrimp broth thi lay ra nau :)
5. Khi nuoc da simmer dc 12' thi cho cilantro, nuoc mam vao, tom da boc vo vao noi, simmer khoang 1' nua roi tat bep di. Va('t chanh vao noi, nguay nguay roi muc ra bat. Rac it tieu (pepper) len. Neu thay chua du do man thi cho it muoi va nuoc mam (to thi thay no du do man roi nen chang cho them lam j nua).
Mac du an rat ngon nhung to thay co' nhung diem sau can khac fuc (mac du to chua biet khac phuc the nao :D ):
1. Màu Soup ko trong, ko co' va'ng do o tren. Chang nhe lan sau to la.i cho chili oil vao :D Ko thi lai fai bo dau tom vao lai noi nuoc dung...
2. Mui cua lemon grass chua dc noi bat lam. Theo cong thuc trong sach thi no chi dung co' 1 stalk lemon grass. O cong thuc tren to sua thanh 3 roi. Hy vong la mui soup se ngon hon.
Neu ai co' cong thuc ngon hon cho mon nay thi chi cho to voi nhe. To rat me mon nay :D

Subscribe to:
Posts (Atom)